Sushi is a delicate and flavorful Japanese cuisine that has captured the hearts and taste buds of people around the world. Whether you’re a sushi enthusiast or a complete beginner, making sushi at home can be both fun and rewarding. From preparing the perfect sushi rice to assembling intricate rolls, this guide will walk you through the process, share tips for beginners, and introduce you to the rich history of sushi.
A Brief Introduction to Sushi
Sushi, at its core, refers to vinegared rice combined with various ingredients, including fish, vegetables, and sometimes fruit. The dish has evolved over centuries, with different regions of Japan contributing their own unique variations. The three most common types of sushi are:
- Nigiri: Hand-pressed sushi, where a small mound of rice is topped with a slice of fish or seafood.
- Maki: Sushi rolls, where fish, vegetables, or other fillings are rolled inside a sheet of seaweed (nori) and sliced into bite-sized pieces.
- Temaki: Hand rolls, which are cones of seaweed filled with rice and toppings, eaten with your hands.
The best part? You can create these delicious sushi varieties at home, tailoring them to your personal preferences.
Step-by-Step Guide to Making Sushi
1. Prepare the Sushi Rice
The key to great sushi is perfect sushi rice, which should be sticky and flavorful. Here’s how to prepare it:
Ingredients:
- 2 cups sushi rice (short-grain or medium-grain rice)
- 2 cups water (for rinsing rice)
- 2 cups water (for cooking rice)
- 3 tablespoons rice vinegar
- 2 tablespoons sugar
- 1 tablespoon salt
Instructions:
- Rinse the Rice: Place the sushi rice in a bowl and rinse it under cold water. Use your fingers to gently rub the grains together until the water runs clear. This removes excess starch and helps the rice achieve the right texture.
- Cook the Rice: In a rice cooker or on the stove, combine the rinsed rice with 2 cups of water and cook according to your rice cooker’s instructions, or bring it to a boil, then reduce to a simmer and cover for 20 minutes.
- Season the Rice: While the rice is cooking, combine the rice vinegar, sugar, and salt in a small bowl. Heat the mixture over low heat until the sugar dissolves, then let it cool.
- Mix the Rice: Once the rice is cooked, transfer it to a large bowl (preferably a wooden or non-stick bowl to avoid sticking). While it’s still hot, gently fold the vinegar mixture into the rice. Use a fan to cool the rice, which gives it a nice glossy finish.
Tip: Let the rice cool to room temperature before using it in your sushi.
2. Select Fresh Fish and Ingredients
The next step in your sushi-making journey is choosing your fillings. For beginners, it’s important to start with ingredients that are easy to work with and widely available. If you’re new to sushi, consider using the following:
- Fish: Fresh fish is essential for good sushi. If you have access to a reputable fishmonger or Asian grocery store, ask for sushi-grade fish. Common choices include tuna, salmon, yellowtail, and snapper. If you’re hesitant about raw fish, smoked salmon, cooked shrimp, or even canned tuna make great substitutes.
- Vegetables: If you’re a vegetarian or prefer non-fish sushi, you can fill your rolls with vegetables like avocado, cucumber, carrot, and asparagus.
- Nori: Nori is the dried seaweed used to wrap sushi rolls. You can buy sheets of nori at most grocery stores or Asian markets.
Tip: Always select the freshest fish possible. Fresh, sushi-grade fish should be firm, moist, and have a clean, oceanic smell. If you’re unsure, ask your supplier about the best options for sushi making.
3. Prepare the Rolling Station
To make rolling easier, set up a clean work area and gather your supplies:
- Bamboo sushi rolling mat (makisu)
- Sharp knife (to cut rolls)
- Small bowl of water (to keep your hands wet while working with rice)
- Sushi rice, fish, and vegetables
Tip: Cover the sushi mat with plastic wrap to prevent the rice from sticking.
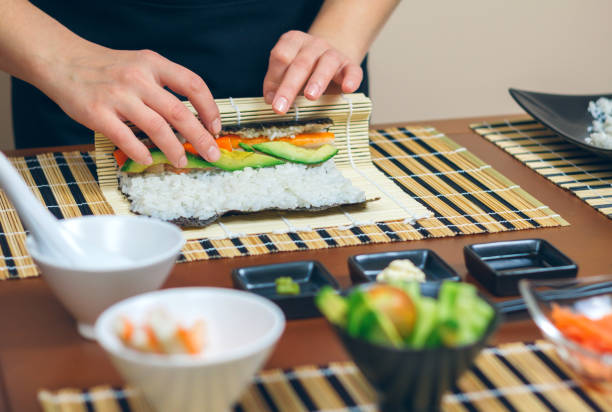
4. Making Maki (Sushi Rolls)
Now, the fun begins! Here’s how to make classic maki rolls:
Instructions:
- Place Nori on the Mat: Lay a sheet of nori on the bamboo mat with the shiny side down.
- Spread the Rice: Wet your hands in the bowl of water to prevent the rice from sticking, then take a handful of rice and gently spread it across the nori, leaving about 1 inch at the top free of rice.
- Add Fillings: Place your fish or vegetable fillings in a line across the center of the rice.
- Roll the Sushi: Starting from the bottom, lift the mat and gently roll the sushi away from you, pressing lightly to keep the roll tight. Once you reach the exposed edge of the nori, wet it with a little water to seal the roll.
- Slice the Roll: Using a sharp knife, slice the roll into bite-sized pieces. Clean the knife between cuts for cleaner slices.
5. Making Temaki (Hand Rolls)
For a simpler and more casual sushi experience, try making temaki, or hand rolls. These are cones of nori filled with rice and toppings.
Instructions:
- Cut the Nori: Cut a sheet of nori in half.
- Fill the Nori: Place a small amount of sushi rice in the bottom left corner of the nori. Add your fillings (fish, avocado, etc.) on top.
- Roll the Nori: Start rolling the nori diagonally, creating a cone shape. Seal the edge with a little water.
- Enjoy Immediately: Temaki should be eaten right away as the nori can become soggy if left too long.
Sushi Etiquette and Tips
While sushi is a casual and delicious food, there are a few basic etiquette rules to keep in mind when dining on sushi, whether at a restaurant or at home:
- Dip Fish, Not Rice: When eating nigiri or maki, dip the fish side (not the rice) into soy sauce to avoid overwhelming the rice with too much soy sauce.
- Eat Quickly: Sushi is best eaten fresh. Try to eat your sushi immediately after it’s made, especially rolls, which can lose their texture if left too long.
- Use Your Hands or Chopsticks: You can use chopsticks or your hands to eat sushi, particularly with hand rolls (temaki).
- Ginger: Pickled ginger is meant to be eaten between bites to cleanse your palate, not as a topping for sushi.
The History of Sushi
Sushi’s origins date back to ancient Japan, where it was first used as a way of preserving fish in fermented rice. Over time, this method evolved into the sushi we know and love today, with sushi rice flavored with vinegar, sugar, and salt.
In the 19th century, modern sushi emerged, particularly in Tokyo, where it was refined into the forms we see now: nigiri, maki, and temaki. The technique of creating bite-sized pieces and using fresh ingredients became a cultural hallmark, with sushi establishments growing into a global phenomenon.
Final Thoughts
Sushi making at home is a fun and creative process that allows you to explore Japanese culinary traditions while also experimenting with your favorite ingredients. Whether you choose to roll maki, form delicate nigiri, or enjoy a hand roll, the beauty of sushi lies in the variety of flavors and textures you can create. By following these steps and tips, you’ll be able to craft your own sushi masterpiece in no time!
So, gather your ingredients, set up your sushi station, and get rolling—your homemade sushi awaits!